This is the multi-page printable view of this section. Click here to print.
Orchestrator: Workflows for Backstage
- 1: Documentation
- 1.1: Quick Start
- 1.2: Architecture
- 1.3: Core Concepts
- 1.3.1: Workflow Types
- 1.4: Installation
- 1.4.1: Requirements
- 1.4.2: Orchestrator on OpenShift
- 1.4.3: Orchestrator on Kubernetes
- 1.4.4: Orchestrator on existing RHDH instance
- 1.4.5: Workflows
- 1.4.5.1: Deploy From Helm Repository
- 1.5: Serverless Workflows
- 1.5.1: Assessment
- 1.5.1.1: MTA Analysis
- 1.5.2: Infrastructure
- 1.5.2.1: Simple Escalation
- 1.5.2.2: Move2Kube
- 1.5.3: Development
- 1.5.4: Workflow Examples
- 1.5.5: Troubleshooting
- 1.5.6: Best Practices
- 1.6: Plugins
- 1.6.1: Notifications Plugin
- 1.6.2: Orchestrator Plugin
1 - Documentation
Orchestrator
Choose a section from the list below. For Orchestrator introduction, check the Quick Start.
1.1 - Quick Start
Quickstart Guide
This quickstart guide will help you install the Orchestrator using the Helm-based operator and execute a sample workflow through the Red Hat Developer Hub orchestrator plugin UI.
Install Orchestrator: Follow the installation instructions for Orchestrator.
Install a sample workflow: Follow the installation instructions for the greetings workflow.
Access Red Hat Developer Hub: Open your web browser and navigate to the Red Hat Developer Hub application. Retrieve the URL using the following OpenShift CLI command.
oc get route backstage-backstage -n rhdh-operator -o jsonpath='{.spec.host}'Make sure the route is accessible to you locally.
Login to Backstage Login to Backstage with the Guest account.
Navigate to Orchestrator: Navigate to the Orchestrator page by clicking on the Orchestrator icon in the left navigation menu.

Execute Greeting Workflow: Click on the ‘Execute’ button in the ACTIONS column of the Greeting workflow.
 The ‘Run workflow’ page will open. Click ‘Next step’ and then ‘Run’


Monitor Workflow Status: Wait for the status of the Greeting workflow execution to become Completed. This may take a moment.

1.2 - Architecture
The Orchestrator architecture comprises several integral components, each contributing to the seamless execution and management of workflows. Illustrated below is a breakdown of these components:
- Red Hat Developer Hub: Serving as the primary interface, Backstage fulfills multiple roles:
- Orchestrator Plugins: Both frontend and backend plugins are instrumental in presenting deployed workflows for execution and monitoring.
- Notifications Plugin: Employs notifications to inform users or groups about workflow events.
- OpenShift Serverless Logic Operator: This controller manages the Sonataflow custom resource (CR), where each CR denotes a deployed workflow.
- Sonataflow Runtime/Workflow Application: As a deployed workflow, Sonataflow Runtime is currently managed as a Kubernetes (K8s) deployment by the operator. It operates as an HTTP server, catering to requests for executing workflow instances. Within the Orchestrator deployment, each Sonataflow CR corresponds to a singular workflow. However, outside this scope, Sonataflow Runtime can handle multiple workflows. Interaction with Sonataflow Runtime for workflow execution is facilitated by the Orchestrator backend plugin.
- Data Index Service: This serves as a repository for workflow definitions, instances, and their associated jobs. It exposes a GraphQL API, utilized by the Orchestrator backend plugin to retrieve workflow definitions and instances.
- Job Service: Dedicated to orchestrating scheduled tasks for workflows.
- OpenShift Serverless: This operator furnishes serverless capabilities essential for workflow communication. It employs Knative eventing to interface with the Data Index service and leverages Knative functions to introduce more intricate logic to workflows.
- OpenShift AMQ Streams (Strimzi/Kafka): While not presently integrated into the deployment’s current iteration, this operator is crucial for ensuring the reliability of the eventing system.
- KeyCloak: Responsible for authentication and security services within applications. While not installed by the Orchestrator operator, it is essential for enhancing security measures.
- PostgreSQL Server - Utilized for storing both Sonataflow information and Backstage data, PostgreSQL Server provides a robust and reliable database solution essential for data persistence within the Orchestrator ecosystem.


1.3 - Core Concepts
1.3.1 - Workflow Types
The Orchestrator features two primary workflow categories:
- Infrastructure workflows: focus on automating infrastructure-related tasks
- Assessment workflows: focus on evaluating and analyzing data to suggest suitable infrastructure workflow options for subsequent execution
Infrastructure workflow
In the Orchestrator, an infrastructure refers to a workflow that executes a sequence of operations based on user input (optional) and generates output (optional) without requiring further action.
To define this type, developers need to include the following annotation in the workflow definition file:
annotations:
  - "workflow-type/infrastructure"
The Orchestrator plugin utilizes this metadata to facilitate the processing and visualization of infrastructure workflow inputs and outputs within the user interface.
Examples:
Assessment workflow
In the Orchestrator, an assessment is akin to an infrastructure workflow that concludes with a recommended course of action. Upon completion, the assessment yields a workflowOptions object, which presents a list of infrastructure workflows suitable from the user’s inputs evaluation.
To define this type, developers must include the following annotation in the workflow definition file:
annotations:
  - "workflow-type/assessment"
The Orchestrator plugin utilizes this metadata to facilitate the processing and visualization of assessment workflow inputs and outputs within the user interface. This includes generating links to initiate infrastructure workflows from the list of recommended options, enabling seamless execution and integration.
The workflowOptions object must possess six essential attributes with specific types, including lists that can be empty or contain objects with id and name properties, similar to the currentVersion attribute. See an example in the below code snippet.
It is the assessment workflow developer’s responsibility to ensure that the provided workflow id in each workflowOptions attribute exists and is available in the environment.
{
    "workflowOptions": {
      "currentVersion": {
        "id": "_AN_INFRASTRUCTURE_WORKFLOW_ID_",
        "name": "_AN_INFRASTRUCTURE_WORKFLOW_NAME_"
      },
      "newOptions": [],
      "otherOptions": [],
      "upgradeOptions": [],
      "migrationOptions": [
        {
            "id": "_ANOTHER_INFRASTRUCTURE_WORKFLOW_ID_",
            "name": "_ANOTHER_INFRASTRUCTURE_WORKFLOW_NAME_"
        }
      ],
      "continuationOptions": []
    }
}
Examples:
Note
If the aforementioned annotation is missing in the workflow definition file, the Orchestrator plugin will default to treating the workflow as an infrastructure workflow, without considering its output.
To avoid unexpected behavior and ensure clarity, it is strongly advised to always include the annotation to explicitly specify the workflow type, preventing any surprises or misinterpretations.
1.4 - Installation
The deployment of the orchestrator involves multiple independent components, each with its unique installation process. In an OpenShift Cluster, the Red Hat Catalog provides an operator that can handle the installation for you. This installation process is modular, as the CRD exposes various flags that allow you to control which components to install. For a vanilla Kubernetes, there is a helm chart that installs the orchestrator compoments.
The Orchestrator deployment encompasses the installation of the engine for serving serverless workflows and Backstage, integrated with orchestrator plugins for workflow invocation, monitoring, and control.
In addition to the Orchestrator deployment, we offer several workflows (linked below) that can be deployed using their respective installation methods.
1.4.1 - Requirements
Operators
The Orchestrator runtime/deployment is made of two main parts: OpenShift Serverless Logic operator and RHDH operator
OpenShift Serverless Logic operator requirements
OpenShift Serverless Logic operator resource requirements are described OpenShift Serverless Logic Installation Requirements. This is mainly for local environment settings.
The operator deploys a Data Index service and a Jobs service.
These are the recommended minimum resource requirements for their pods:Data Index pod:
resources:
      limits:
        cpu: 500m
        memory: 1Gi
      requests:
        cpu: 250m
        memory: 64Mi
Jobs pod:
resources:
      limits:
        cpu: 200m
        memory: 1Gi
      requests:
        cpu: 100m
        memory: 1Gi
The resources for these pods are controlled by a CR of type SonataFlowPlatform. There is one such CR in the sonataflow-infra namespace.
RHDH operator requirements
The requirements for RHDH operator and its components are described here
Workflows
Each workflow has its own logic and therefore different resource requirements that are influenced by its specific logic.
Here are some metrics for the workflows we provide. For each workflow you have the following fields: cpu idle, cpu peak (during execution), memory.
- greeting workflow
- cpu idle: 4m
- cpu peak: 12m
- memory: 300 Mb
- mtv-plan workflow
- cpu idle: 4m
- cpu peak: 130m
- memory: 300 Mb
How to evaluate resource requirements for your workflow
Locate the workflow pod in OCP Console. There is a tab for Metrics. Here you’ll find the CPU and memory. Execute the workflow a few times. It does not matter whether it succeeds or not as long as all the states are executed. Now you can see the peak usage (execution) and the idle usage (after a few executions).
1.4.2 - Orchestrator on OpenShift
Installing the Orchestrator is facilitated through an operator available in the Red Hat Catalog in the OLM package. This operator is responsible for installing all of the Orchestrator components. The Orchestrator is based on the SonataFlow and the Serverless Workflow technologies to design and manage the workflows. The Orchestrator plugins are deployed on a Red Hat Developer Hub instance, which serves as the frontend.
When installing a Red Hat Developer Hub (RHDH) instance using the Orchestrator operator, the RHDH configuration is managed through the Orchestrator resource.
To utilize Backstage capabilities, the Orchestrator imports software templates designed to ease the development of new workflows and offers an opinionated method for managing their lifecycle by including CI/CD resources as part of the template.
Orchestrator Documentation
For comprehensive documentation on the Orchestrator, please visit https://www.rhdhorchestrator.io.
Installing the Orchestrator Helm Operator
Deploy the Orchestrator solution suite in an OCP cluster using the Orchestrator operator.
The operator installs the following components onto the target OpenShift cluster:
- RHDH (Red Hat Developer Hub) Backstage
- OpenShift Serverless Logic Operator (with Data-Index and Job Service)
- OpenShift Serverless Operator
- Knative Eventing
- Knative Serving
- (Optional) An ArgoCD project named
orchestrator. Requires an pre-installed ArgoCD/OpenShift GitOps instance in the cluster. Disabled by default - (Optional) Tekton tasks and build pipeline. Requires an pre-installed Tekton/OpenShift Pipelines instance in the cluster with version <= 1.16. Disabled by default
Important Note for ARM64 Architecture Users
Note that as of November 6, 2023, OpenShift Serverless Operator is based on RHEL 8 images which are not supported on the ARM64 architecture. Consequently, deployment of this operator on an OpenShift Local cluster on MacBook laptops with M1/M2 chips is not supported.
Prerequisites
- Logged in to a Red Hat OpenShift Container Platform (version 4.13+) cluster as a cluster administrator.
- OpenShift CLI (oc) is installed.
- Operator Lifecycle Manager (OLM) has been installed in your cluster.
- Your cluster has a default storage class provisioned.
- A GitHub API Token - to import items into the catalog, ensure you have a
GITHUB_TOKENwith the necessary permissions as detailed here.- For classic token, include the following permissions:
- repo (all)
- admin:org (read:org)
- user (read:user, user:email)
- workflow (all) - required for using the software templates for creating workflows in GitHub
- For Fine grained token:
- Repository permissions: Read access to metadata, Read and Write access to actions, actions variables, administration, code, codespaces, commit statuses, environments, issues, pull requests, repository hooks, secrets, security events, and workflows.
- Organization permissions: Read access to members, Read and Write access to organization administration, organization hooks, organization projects, and organization secrets.
- For classic token, include the following permissions:
⚠️Warning: Skipping these steps will prevent the Orchestrator from functioning properly.
Deployment with GitOps
If you plan to deploy in a GitOps environment, make sure you have installed the ArgoCD/Red Hat OpenShift GitOps and the Tekton/Red Hat Openshift Pipelines Install operators following these instructions.
The Orchestrator installs RHDH and imports software templates designed for bootstrapping workflow development. These templates are crafted to ease the development lifecycle, including a Tekton pipeline to build workflow images and generate workflow K8s custom resources. Furthermore, ArgoCD is utilized to monitor any changes made to the workflow repository and to automatically trigger the Tekton pipelines as needed.
ArgoCD/OpenShift GitOpsoperator- Ensure at least one instance of
ArgoCDexists in the designated namespace (referenced byARGOCD_NAMESPACEenvironment variable). Example here - Validated API is
argoproj.io/v1alpha1/AppProject
- Ensure at least one instance of
Tekton/OpenShift Pipelinesoperator- Validated APIs are
tekton.dev/v1beta1/Taskandtekton.dev/v1/Pipeline - Requires ArgoCD installed since the manifests are deployed in the same namespace as the ArgoCD instance.
- Validated APIs are
Detailed Installation Guide
From OperatorHub
- Deploying PostgreSQL reference implementation
- If you do not have a PostgreSQL instance in your cluster
you can deploy the PostgreSQL reference implementation by following the steps here. - If you already have PostgreSQL running in your cluster
ensure that the default settings in the PostgreSQL values file match those provided in the Orchestrator values file.
- If you do not have a PostgreSQL instance in your cluster
- Install Orchestrator operator
- Go to OperatorHub in your OpenShift Console.
- Search for and install the Orchestrator Operator.
- Run the Setup Script
- Follow the steps in the Running the Setup Script section to download and execute the setup.sh script, which initializes the RHDH environment.
- Create an Orchestrator instance
- Once the Orchestrator Operator is installed, navigate to Installed Operators.
- Select Orchestrator Operator.
- Click on Create Instance to deploy an Orchestrator instance.
- Verify resources and wait until they are running
From console run the following command get the necessary wait commands:
oc describe orchestrator orchestrator-sample -n openshift-operators | grep -A 10 "Run the following commands to wait until the services are ready:"\The command will return an output similar to the one below, which lists several oc wait commands. This depends on your specific cluster.
  oc wait -n openshift-serverless deploy/knative-openshift --for=condition=Available --timeout=5m
  oc wait -n knative-eventing knativeeventing/knative-eventing --for=condition=Ready --timeout=5m
  oc wait -n knative-serving knativeserving/knative-serving --for=condition=Ready --timeout=5m
  oc wait -n openshift-serverless-logic deploy/logic-operator-rhel8-controller-manager --for=condition=Available --timeout=5m
  oc wait -n sonataflow-infra sonataflowplatform/sonataflow-platform --for=condition=Succeed --timeout=5m
  oc wait -n sonataflow-infra deploy/sonataflow-platform-data-index-service --for=condition=Available --timeout=5m
  oc wait -n sonataflow-infra deploy/sonataflow-platform-jobs-service --for=condition=Available --timeout=5m
  oc get networkpolicy -n sonataflow-infra
Copy and execute each command from the output in your terminal. These commands ensure that all necessary services and resources in your OpenShift environment are available and running correctly.
If any service does not become available, verify the logs for that service or consult troubleshooting steps.
Manual Install
Deploy the PostgreSQL reference implementation for persistence support in SonataFlow following these instructions
Create a namespace for the Orchestrator solution:
oc new-project orchestratorRun the Setup Script
- Follow the steps in the Running the Setup Script section to download and execute the setup.sh script, which initializes the RHDH environment.
Use the following manifest to install the operator in an OCP cluster:
apiVersion: operators.coreos.com/v1alpha1
kind: Subscription
metadata:
  name: orchestrator-operator
  namespace: openshift-operators
spec:
  channel: stable
  installPlanApproval: Automatic
  name: orchestrator-operator
  source: redhat-operators
  sourceNamespace: openshift-marketplace
Run the following commands to determine when the installation is completed:
wget https://raw.githubusercontent.com/rhdhorchestrator/orchestrator-helm-operator/release-1.3/hack/wait_for_operator_installed.sh -O /tmp/wait_for_operator_installed.sh && chmod u+x /tmp/wait_for_operator_installed.sh && /tmp/wait_for_operator_installed.shDuring the installation process, Kubernetes cronjobs are created by the operator to monitor the lifecycle of the CRs managed by the operator: RHDH operator, OpenShift Serverless operator and OpenShift Serverless Logic operator. When deleting one of the previously mentioned CRs, a job is triggered that ensures the CR is removed before the operator is. In case of any failure at this stage, these jobs remain active, facilitating administrators in retrieving detailed diagnostic information to identify and address the cause of the failure.
Note: that every minute on the clock a job is triggered to reconcile the CRs with the orchestrator resource values. These cronjobs are deleted when their respective features (e.g.
rhdhOperator.enabled=false) are removed or when the orchestrator resource is removed. This is required because the CRs are not managed by helm due to the CRD dependency pre availability to the deployment of the CR.Apply the Orchestrator custom resource (CR) on the cluster to create an instance of RHDH and resources of OpenShift Serverless Operator and OpenShift Serverless Operator Logic. Make any changes to the CR before applying it, or test the default Orchestrator CR:
oc apply -n orchestrator -f https://raw.githubusercontent.com/rhdhorchestrator/orchestrator-helm-operator/refs/heads/release-1.3/config/samples/_v1alpha1_orchestrator.yaml
Running The Setup Script
The setup.sh script simplifies the initialization of the RHDH environment by creating the required authentication secret and labeling GitOps namespaces based on the cluster configuration.
Create a namespace for the RHDH instance. This namespace is predefined as the default in both the setup.sh script and the Orchestrator CR but can be overridden if needed.
oc new-project rhdh-operatorDownload the setup script from the github repository and run it to create the RHDH secret and label the GitOps namespaces:
wget https://raw.githubusercontent.com/rhdhorchestrator/orchestrator-helm-operator/release-1.3/hack/setup.sh -O /tmp/setup.sh && chmod u+x /tmp/setup.shRun the script:
/tmp/setup.sh --use-default
NOTE: If you don’t want to use the default values, omit the --use-default and the script will prompt you for input.
The contents will vary depending on the configuration in the cluster. The following list details all the keys that can appear in the secret:
BACKEND_SECRET: Value is randomly generated at script execution. This is the only mandatory key required to be in the secret for the RHDH Operator to start.K8S_CLUSTER_URL: The URL of the Kubernetes cluster is obtained dynamically usingoc whoami --show-server.K8S_CLUSTER_TOKEN: The value is obtained dynamically based on the provided namespace and service account.GITHUB_TOKEN: This value is prompted from the user during script execution and is not predefined.GITHUB_CLIENT_IDandGITHUB_CLIENT_SECRET: The value for both these fields are used to authenticate against GitHub. For more information open this link.ARGOCD_URL: This value is dynamically obtained based on the first ArgoCD instance available.ARGOCD_USERNAME: Default value is set toadmin.ARGOCD_PASSWORD: This value is dynamically obtained based on the first ArgoCD instance available.
Keys will not be added to the secret if they have no values associated. So for instance, when deploying in a cluster without the GitOps operators, the ARGOCD_URL, ARGOCD_USERNAME and ARGOCD_PASSWORD keys will be omited in the secret.
Sample of a secret created in a GitOps environment:
$> oc get secret -n rhdh-operator -o yaml backstage-backend-auth-secret
apiVersion: v1
data:
  ARGOCD_PASSWORD: ...
  ARGOCD_URL: ...
  ARGOCD_USERNAME: ...
  BACKEND_SECRET: ...
  GITHUB_TOKEN: ...
  K8S_CLUSTER_TOKEN: ...
  K8S_CLUSTER_URL: ...
kind: Secret
metadata:
  creationTimestamp: "2024-05-07T22:22:59Z"
  name: backstage-backend-auth-secret
  namespace: rhdh-operator
  resourceVersion: "4402773"
  uid: 2042e741-346e-4f0e-9d15-1b5492bb9916
type: Opaque
Additional information
Additional Workflow Namespaces
When deploying a workflow in a namespace different from where Sonataflow services are running (e.g., sonataflow-infra), several essential steps must be followed:
Label the Workflow Namespace: To allow Sonataflow services to accept traffic from workflows, apply the following label to the desired workflow namespace:
oc label ns $ADDITIONAL_NAMESPACE rhdh.redhat.com/workflow-namespace=""Identify the RHDH Namespace: Retrieve the namespace where RHDH is running by executing:
oc get backstage -AStore the namespace value in RHDH_NAMESPACE in the Network Policy manifest below.
Identify the Sonataflow Services Namespace: Check the namespace where Sonataflow services are deployed:
oc get sonataflowclusterplatform -AIf there is no cluster platform, check for a namespace-specific platform:
oc get sonataflowplatform -AStore the namespace value in SONATAFLOW_PLATFORM_NAMESPACE.
Set Up a Network Policy: Configure a network policy to allow traffic only between RHDH, Sonataflow services, and the workflows. The policy can be derived from here
oc create -f - <<EOF
apiVersion: networking.k8s.io/v1
kind: NetworkPolicy
metadata:
  name: allow-rhdh-to-sonataflow-and-workflows
  # Sonataflow and Workflows are using the same namespace.
  namespace: $ADDITIONAL_NAMESPACE
spec:
  podSelector: {}
  ingress:
    - from:
      - namespaceSelector:
          matchLabels:
            # Allow RHDH namespace to communicate with workflows.
            kubernetes.io/metadata.name: $RHDH_NAMESPACE
      - namespaceSelector:
          matchLabels:
            # Allow Sonataflow services to communicate with workflows.
            kubernetes.io/metadata.name: $SONATAFLOW_PLATFORM_NAMESPACE
EOF
Ensure Persistence for the Workflow: If persistence is required, follow these steps:
- Create a PostgreSQL Secret:
The workflow needs its own schema in PostgreSQL. Create a secret containing the PostgreSQL credentials in the workflow’s namespace:
oc get secret sonataflow-psql-postgresql -n sonataflow-infra -o yaml > secret.yaml sed -i '/namespace: sonataflow-infra/d' secret.yaml oc apply -f secret.yaml -n $ADDITIONAL_NAMESPACE - Configure the Namespace Attribute:
Add the namespace attribute under the
serviceRefproperty where the PostgreSQL server is deployed.Replace POSTGRESQL_NAMESPACE with the namespace where the PostgreSQL server is deployed.apiVersion: sonataflow.org/v1alpha08 kind: SonataFlow ... spec: ... persistence: postgresql: secretRef: name: sonataflow-psql-postgresql passwordKey: postgres-password userKey: postgres-username serviceRef: databaseName: sonataflow databaseSchema: greeting name: sonataflow-psql-postgresql namespace: $POSTGRESQL_NAMESPACE port: 5432
By following these steps, the workflow will have the necessary credentials to access PostgreSQL and will correctly reference the service in a different namespace.
GitOps environment
See the dedicated document
Deploying PostgreSQL reference implementation
See here
ArgoCD and workflow namespace
If you manually created the workflow namespaces (e.g., $WORKFLOW_NAMESPACE), run this command to add the required label that allows ArgoCD to deploy instances there:
oc label ns $WORKFLOW_NAMESPACE argocd.argoproj.io/managed-by=$ARGOCD_NAMESPACE
Workflow installation
Follow Workflows Installation
Cleanup
/!\ Before removing the orchestrator, make sure you have first removed any installed workflows. Otherwise the deletion may become hung in a terminating state.
To remove the operator from the cluster, delete the subscription:
oc delete subscriptions.operators.coreos.com orchestrator-operator -n openshift-operators
Note that the CRDs created during the installation process will remain in the cluster.
To clean the rest of the resources, run:
oc get crd -o name | grep -e sonataflow -e rhdh | xargs oc delete
oc delete namespace orchestrator sonataflow-infra rhdh-operator
If you want to remove knative related resources, you may also run:
oc get crd -o name | grep -e knative | xargs oc delete
1.4.3 - Orchestrator on Kubernetes
The following guide is for installing on a Kubernetes cluster. It is well tested and working in CI with a kind installation.
Here’s a kind configuration that is easy to work with (the apiserver port is static, so the kubeconfig is always the same)
kind: Cluster
apiVersion: kind.x-k8s.io/v1alpha4
networking:
  apiServerAddress: "127.0.0.1"
  apiServerPort: 16443
nodes:
  - role: control-plane
    kubeadmConfigPatches:
    - |
      kind: InitConfiguration
      nodeRegistration:
        kubeletExtraArgs:
          node-labels: "ingress-ready=true"
    - |
      kind: KubeletConfiguration
      localStorageCapacityIsolation: true
    extraPortMappings:
      - containerPort: 80
        hostPort: 9090
        protocol: TCP
      - containerPort: 443
        hostPort: 9443
        protocol: TCP
  - role: worker
Save this file as kind-config.yaml, and now run:
kind create cluster --config kind-config.yaml
kubectl apply -f https://projectcontour.io/quickstart/contour.yaml
kubectl patch daemonsets -n projectcontour envoy -p '{"spec":{"template":{"spec":{"nodeSelector":{"ingress-ready":"true"},"tolerations":[{"key":"node-role.kubernetes.io/control-plane","operator":"Equal","effect":"NoSchedule"},{"key":"node-role.kubernetes.io/master","operator":"Equal","effect":"NoSchedule"}]}}}}'
The cluster should be up and running with Contour ingress-controller installed, so localhost:9090 will direct the traffic to Backstage, because of the ingress created by the helm chart on port 80.
Orchestrator-k8s helm chart
This chart will install the Orchestrator and all its dependencies on kubernetes.
THIS CHART IS NOT SUITED FOR PRODUCTION PURPOSES, you should only use it for development or tests purposes
The chart deploys:
- RHDH-backstage https://github.com/redhat-developer/rhdh-chart
- Serverless Workflows Operator (see sonata-serverless-operator.yaml)
- knative serving
- Knative eventing
- Serverless Workflows (optional)
Usage
helm repo add orchestrator https://rhdhorchestrator.github.io/orchestrator-helm-chart

helm install orchestrator orchestrator/orchestrator-k8s
Configuration
All of the backstage app-config is derived from the values.yaml.
Secrets as env vars:
To use secret as env vars, like the one used for the notification, see charts/Orchestrator-k8s/templates/secret.yaml Every key in that secret will be available in the app-config for resolution.
Development
git clone https://github.com/rhdhorchestrator.github.io/orchestrator-helm-chart
cd orchestrator-helm-chart/charts/orchestrator-k8s


helm repo add bitnami https://charts.bitnami.com/bitnami
helm repo add backstage https://backstage.github.io/charts
helm repo add postgresql https://charts.bitnami.com/bitnami
helm repo add redhat-developer https://redhat-developer.github.io/rhdh-chart
helm repo add workflows https://rhdhorchestrator.io/serverless-workflows-config

helm dependencies build
helm install orchestrator .
The output should look like that
$ helm install orchestrator .
Release "orchestrator" has been upgraded. Happy Helming!
NAME: orchestrator
LAST DEPLOYED: Tue Sep 19 18:19:07 2023
NAMESPACE: default
STATUS: deployed
REVISION: 1
NOTES:
This chart will install RHDH-backstage(RHDH upstream) + Serverless Workflows.

To get RHDH's route location:
    $ oc get route orchestrator-white-backstage -o jsonpath='https://{ .spec.host }{"\n"}'

To get the serverless workflow operator status:
    $ oc get deploy -n sonataflow-operator-system

To get the serverless workflows status:
    $ oc get sf
The chart notes will provide more information on:
- route location of backstage
- the sonata operator status
- the sonata workflow deployed status
1.4.4 - Orchestrator on existing RHDH instance
When RHDH is already installed and in use, reinstalling it is unnecessary. Instead, integrating the Orchestrator into such an environment involves a few key steps:
- Utilize the Orchestrator operator to install the requisite components, such as the OpenShift Serverless Logic Operator and the OpenShift Serverless Operator, while ensuring the RHDH installation is disabled.
- Manually update the existing RHDH ConfigMap resources with the necessary configuration for the Orchestrator plugin.
- Import the Orchestrator software templates into the Backstage catalog.
Prerequisites
- RHDH is already deployed with a running Backstage instance.
- Software templates for workflows requires GitHub provider to be configured.
- Ensure that a PostgreSQL database is available and that you have credentials to manage the tablespace (optional).
- For your convenience, a reference implementation is provided.
- If you already have a PostgreSQL database installed, please refer to this note regarding default settings.
In this approach, since the RHDH instance is not managed by the Orchestrator operator, its configuration is handled through the Backstage CR along with the associated resources, such as ConfigMaps and Secrets.
The installation steps are detailed here.
1.4.5 - Workflows
In addition to deploying the Orchestrator, we provide several preconfigured workflows that serve either as ready-to-use solutions or as starting points for customizing workflows according to the user’s requirements. These workflows can be installed through a Helm chart.
1.4.5.1 - Deploy From Helm Repository
Orchestrator Workflows Helm Repository
This repository serves as a Helm chart repository for deploying serverless workflows with the Sonataflow Operator. It encompasses a collection of pre-defined workflows, each tailored to specific use cases. These workflows have undergone thorough testing and validation through Continuous Integration (CI) processes and are organized according to their chart versions.
The repository includes a variety of serverless workflows, such as:
- Greeting: A basic example workflow to demonstrate functionality.
- Migration Toolkit for Application Analysis (MTA): This workflow evaluates applications to determine potential risks and the associated costs of containerizing the applications.
- Move2Kube: Designed to facilitate the transition of an application to Kubernetes (K8s) environments.
- …
Usage
Prerequisites
To utilize the workflows contained in this repository, the Orchestrator Deployment must be installed on your OpenShift Container Platform (OCP) cluster. For detailed instructions on installing the Orchestrator, please visit the Orchestrator Helm Based Operator Repository
Installation
helm repo add orchestrator-workflows https://rhdhorchestrator.io/serverless-workflows-config
View available workflows on the Helm repository:
helm search repo orchestrator-workflows
The expected result should look like (with different versions):
NAME                            	CHART VERSION	APP VERSION	DESCRIPTION
orchestrator-workflows/greeting 	0.4.2        	1.16.0     	A Helm chart for the greeting serverless workflow
orchestrator-workflows/move2kube	0.2.16       	1.16.0     	A Helm chart to deploy the move2kube workflow.
orchestrator-workflows/mta      	0.2.16       	1.16.0     	A Helm chart for MTA serverless workflow
orchestrator-workflows/workflows	0.2.24       	1.16.0     	A Helm chart for serverless workflows
...
You can install the workflows following their respective README
Installing workflows in additional namespaces
When deploying a workflow in a namespace different from where Sonataflow services are running (e.g. sonataflow-infra), there are essential steps to follow. For detailed instructions, see the Additional Workflow Namespaces section.
Version Compatability
The workflows rely on components included in the Orchestrator Operator. Therefore, it is crucial to match the workflow version with the corresponding Orchestrator version that supports it. The list below outlines the compatibility between the workflows and Orchestrator versions:
| Workflows | Chart Version | Orchestrator Operator Version |
|---|---|---|
| move2kube | 1.3.x | 1.3.x |
| create-ocp-project | 1.3.x | 1.3.x |
| request-vm-cnv | 1.3.x | 1.3.x |
| modify-vm-resources | 1.3.x | 1.3.x |
| mta-v7 | 1.3.x | 1.3.x |
| mtv-migration | 1.3.x | 1.3.x |
| mtv-plan | 1.3.x | 1.3.x |
| ——————– | ————— | ———————- |
| mta-analysis | 0.3.x | 1.2.x |
| move2kube | 0.3.x | 1.2.x |
| create-ocp-project | 0.1.x | 1.2.x |
| request-vm-cnv | 0.1.x | 1.2.x |
| modify-vm-resources | 0.1.x | 1.2.x |
| mta-v6 | 0.2.x | 1.2.x |
| mta-v7 | 0.2.37 | 1.2.x |
| mtv-migration | 0.0.x | 1.2.x |
| mtv-plan | 0.0.13 | 1.2.x |
Helm index
https://www.rhdhorchestrator.io/serverless-workflows-config/index.yaml
1.5 - Serverless Workflows
A serverless workflow in Orchestrator refers to a sequence of operations that run in response to user input (optional) and produce output (optional) without requiring any ongoing management of the underlying infrastructure. The workflow is executed automatically, and frees users from having to manage or provision servers. This simplifies the process by allowing the focus to remain on the logic of the workflow, while the infrastructure dynamically adapts to handle the execution.
1.5.1 - Assessment
1.5.1.1 - MTA Analysis
MTA - migration analysis workflow
Synopsis
This workflow is an assessment workflow type, that invokes an application analysis workflow using MTA and returns the move2kube workflow reference, to run next if the analysis is considered to be successful.
Users are encouraged to use this workflow as self-service alternative for interacting with the MTA UI. Instead of running a mass-migration of project from a managed place, the project stakeholders can use this (or automation) to regularly check the cloud-readiness compatibility of their code.
Workflow application configuration
Application properties can be initialized from environment variables before running the application:
| Environment variable | Description | Mandatory | Default value |
|---|---|---|---|
BACKSTAGE_NOTIFICATIONS_URL | The backstage server URL for notifications | ✅ | |
NOTIFICATIONS_BEARER_TOKEN | The authorization bearer token to use to send notifications | ✅ | |
MTA_URL | The MTA Hub server URL | ✅ |
Inputs
repositoryUrl[mandatory] - the git repo url to examinerecipients[mandatory] - A list of recipients for the notification in the format ofuser:<namespace>/<username>orgroup:<namespace>/<groupname>, i.e.user:default/jsmith.
Output
- On completion the workflow returns an options structure in the exit state of the workflow (also named variables in SonataFlow) linking to the move2kube workflow that will generate k8s manifests for container deployment.
- When the workflow completes there should be a report link on the exit state of the workflow (also named variables in SonataFlow) Currently this is working with MTA version 6.2.x and in the future 7.x version the report link will be removed or will be made optional. Instead of an html report the workflow will use a machine friendly json file.
Dependencies
MTA version 6.2.x or Konveyor 0.2.x
- For OpenShift install MTA using the OperatorHub, search for MTA. Documentation is here
- For Kubernetes install Konveyor with olm
kubectl create -f https://operatorhub.io/install/konveyor-0.2/konveyor-operator.yaml
Runtime configuration
| key | default | description |
|---|---|---|
| mta.url | http://mta-ui.openshift-mta.svc.cluster.local:8080 | Endpoint (with protocol and port) for MTA |
| quarkus.rest-client.mta_json.url | ${mta.url}/hub | MTA hub api |
| quarkus.rest-client.notifications.url | ${BACKSTAGE_NOTIFICATIONS_URL:http://backstage-backstage.rhdh-operator/api/notifications/} | Backstage notification url |
| quarkus.rest-client.mta_json.auth.basicAuth.username | username | Username for the MTA api |
| quarkus.rest-client.mta_json.auth.basicAuth.password | password | Password for the MTA api |
All the configuration items are on [./application.properties]
For running and testing the workflow refer to mta testing.
Workflow Diagram

Installation
1.5.2 - Infrastructure
1.5.2.1 - Simple Escalation
ocp-onboarding-schema# Simple escalation workflow An escalation workflow integrated with Atlassian JIRA using SonataFlow.
Prerequisite
- Access to a Jira server (URL, user and API token)
- Access to an OpenShift cluster with
adminRole
Workflow diagram

Note:
The value of the .jiraIssue.fields.status.statusCategory.key field is the one to be used to identify when the done status is reached, all the other
similar fields are subject to translation to the configured language and cannot be used for a consistent check.
Application configuration
Application properties can be initialized from environment variables before running the application:
| Environment variable | Description | Mandatory | Default value |
|---|---|---|---|
JIRA_URL | The Jira server URL | ✅ | |
JIRA_USERNAME | The Jira server username | ✅ | |
JIRA_API_TOKEN | The Jira API Token | ✅ | |
JIRA_PROJECT | The key of the Jira project where the escalation issue is created | ❌ | TEST |
JIRA_ISSUE_TYPE | The ID of the Jira issue type to be created | ✅ | |
OCP_API_SERVER_URL | The OpensShift API Server URL | ✅ | |
OCP_API_SERVER_TOKEN | The OpensShift API Server Token | ✅ | |
ESCALATION_TIMEOUT_SECONDS | The number of seconds to wait before triggering the escalation request, after the issue has been created | ❌ | 60 |
POLLING_PERIODICITY | The polling periodicity of the issue state checker, according to ISO 8601 duration format | ❌ | PT6S |
How to run
mvn clean quarkus:dev
Example of POST to trigger the flow (see input schema in ticket-escalation-schema.json):
curl -XPOST -H "Content-Type: application/json" http://localhost:8080/ticket-escalation -d '{"namespace": "_YOUR_NAMESPACE_"}'
Tips:
- Visit Workflow Instances
- Visit (Data Index Query Service)[http://localhost:8080/q/graphql-ui/]
1.5.2.2 - Move2Kube
Move2kube (m2k) workflow
Context
This workflow is using https://move2kube.konveyor.io/ to migrate the existing code contained in a git repository to a K8s/OCP platform.
Once the transformation is over, move2kube provides a zip file containing the transformed repo.
Design diagram
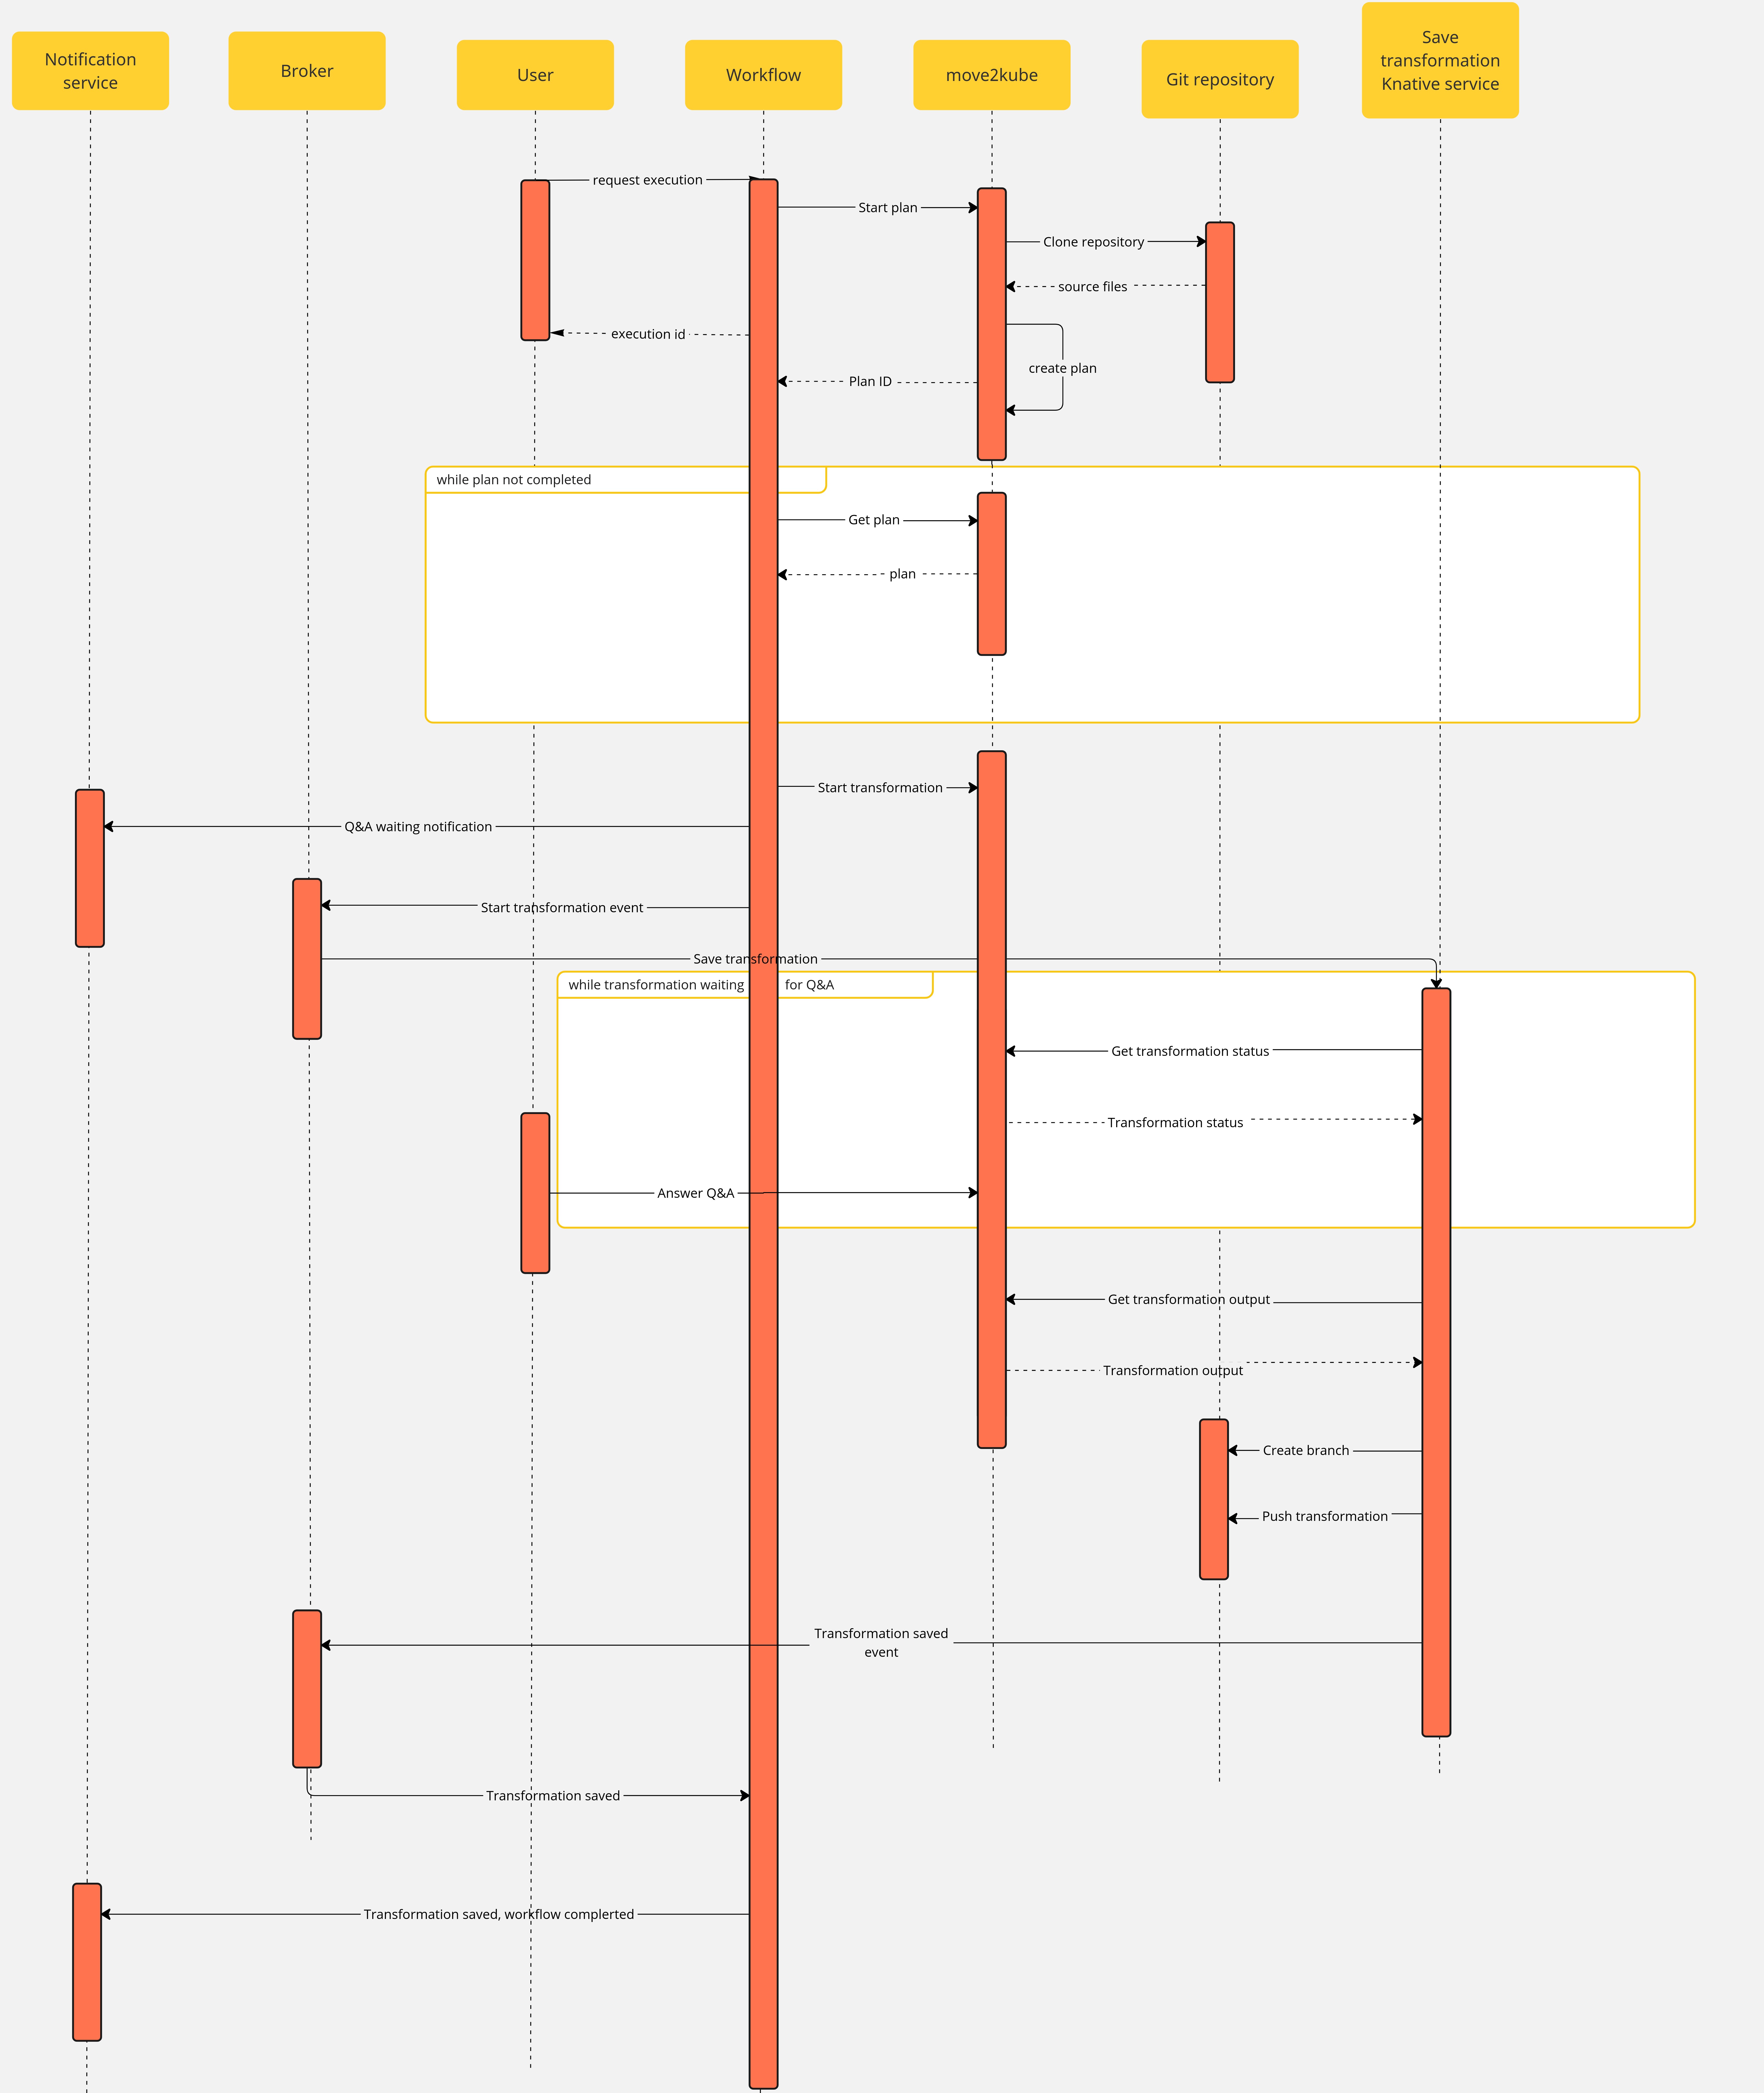

Workflow

Note that if an error occurs during the migration planning there is no feedback given by the move2kube instance API. To overcome this, we defined a maximum amount of retries (move2kube_get_plan_max_retries) to execute while getting the planning before exiting with an error. By default the value is set to 10 and it can be overridden with the environment variable MOVE2KUBE_GET_PLAN_MAX_RETRIES.
Workflow application configuration
Move2kube workflow
Application properties can be initialized from environment variables before running the application:
| Environment variable | Description | Mandatory | Default value |
|---|---|---|---|
MOVE2KUBE_URL | The move2kube instance server URL | ✅ | |
BACKSTAGE_NOTIFICATIONS_URL | The backstage server URL for notifications | ✅ | |
NOTIFICATIONS_BEARER_TOKEN | The authorization bearer token to use to send notifications | ✅ | |
MOVE2KUBE_GET_PLAN_MAX_RETRIES | The amount of retries to get the plan before failing the workflow | ❌ | 10 |
m2k-func serverless function
Application properties can be initialized from environment variables before running the application:
| Environment variable | Description | Mandatory | Default value |
|---|---|---|---|
MOVE2KUBE_API | The move2kube instance server URL | ✅ | |
SSH_PRIV_KEY_PATH | The absolute path to the SSH private key | ✅ | |
BROKER_URL | The knative broker URL | ✅ | |
LOG_LEVEL | The log level | ❌ | INFO |
Components
The use case has the following components:
m2k: theSonataflowresource representing the workflow. A matchingDeploymentis created by the sonataflow operator..m2k-save-transformation-func: the KnativeServiceresource that holds the service retrieving the move2kube instance output and saving it to the git repository. A matchingDeploymentis created by the Knative deployment.move2kube instance: theDeploymentrunning the move2kube instance- Knative
Trigger:m2k-save-transformation-event: event sent by them2kworkflow that will trigger the execution ofm2k-save-transformation-func.transformation-saved-trigger-m2k: event sent bym2k-save-transformation-funcif/once the move2kube output is successfully saved to the git repository.error-trigger-m2k: event sent bym2k-save-transformation-funcif an error while saving the move2kube output to the git repository.
- The Knative
Brokernameddefaultwhich link the components together.
Installation
See official installation guide
Usage
- Create a workspace and a project under it in your move2kube instance
- you can reach your move2kube instance by running
Sample output:oc -n sonataflow-infra get routesNAME HOST/PORT PATH SERVICES PORT TERMINATION WILDCARD move2kube-route move2kube-route-sonataflow-infra.apps.cluster-c68jb.dynamic.redhatworkshops.io move2kube-svc <all> edge None- for more information, please refer to https://move2kube.konveyor.io/tutorials/ui
- Go to the backstage instance.
To get it, you can run
oc -n rhdh-operator get routes
Sample output:
NAME                  HOST/PORT                                                                            PATH   SERVICES              PORT           TERMINATION     WILDCARD
backstage-backstage   backstage-backstage-rhdh-operator.apps.cluster-c68jb.dynamic.redhatworkshops.io   /      backstage-backstage   http-backend   edge/Redirect   None
Go to the
Orchestratorpage.Click on
Move2Kube workflowand then click therunbutton on the top right of the page.In the
repositoryURLfield, put the URL of your git projectIn the
sourceBranchfield, put the name of the branch holding the project you want to transform- ie:
main
- ie:
In the
targetBranchfield, put the name of the branch in which you want the move2kube output to be persisted. If the branch exists, the workflow will fail- ie:
move2kube-output
- ie:
In the
workspaceIdfield, put the ID of the move2kube instance workspace to use for the transformation. Use the ID of the workspace created at the 1st step.- ie:
a46b802d-511c-4097-a5cb-76c892b48d71
- ie:
In the
projectIdfield, put the ID of the move2kube instance project under the previous workspace to use for the transformation. Use the ID of the project created at the 1st step.- ie:
9c7f8914-0b63-4985-8696-d46c17ba4ebe
- ie:
Then click on
nextStepClick on
runto trigger the executionOnce a new transformation has started and is waiting for your input, you will receive a notification with a link to the Q&A
- For more information about what to expect and how to answer the Q&A, please visit the official move2kube documentation
Once you completed the Q&A, the process will continue and the output of the transformation will be saved in your git repository, you will receive a notification to inform you of the completion of the workflow.
- You can now clone the repository and checkout the output branch to deploy your manifests to your cluster! You can check the move2kube documention if you need guidance on how to deploy the generated artifacts.
1.5.3 - Development
Serverless-Workflows
A selected set of serverless workflows.
Here is the layout of directories per workflow. Each folder contains at least:
application.propertiesthe configuration item specific for the workflow app itself.${workflow}.sw.yamlthe serverless workflow definitions with respect to the best practices.specs/optional folder with OpenAPI specs if the flow needs them.
All .svg can be ignored, there’s no real functional use for them in deployment and all of them are created by VSCode extension.
Every workflow has a matching container image pushed to quay.io by a github workflows
in the form of quay.io/orchestrator/serverless-workflow-${workflow}.
Current image statuses:
- https://quay.io/repository/orchestrator/serverless-workflow-mta-v7.x
- https://quay.io/repository/orchestrator/serverless-workflow-m2k
- https://quay.io/repository/orchestrator/serverless-workflow-greeting
- https://quay.io/repository/orchestrator/serverless-workflow-escalation
After image publishing, GitHub action will generate kubernetes manifests and push a PR to the workflows helm chart repo under a directory matching the workflow name. This repo is used to deploy the workflows to an environment with Sonataflow operator running.
How to introduce a new workflow
Follow these steps to successfully add a new workflow:
- Create a folder under the root with the name of the flow, e.x
/onboarding - Copy
application.properties,onboarding.sw.yamlinto that folder - Create a GitHub workflow file
.github/workflows/${workflow}.yamlthat will callmainworkflow (see greeting.yaml) - Create a pull request but don’t merge yet.
- Send a pull request to serverless-workflows-config repository to add a sub-chart
under the path
charts/workflows/charts/onboarding. You can copy the greeting sub-chart directory and files. - Create a PR to serverless-workflows-config repository and make sure its merge.
- Now the PR from 4 can be merged and an automatic PR will be created with the generated manifests. Review and merge.
See Continuous Integration with make for implementation details of the CI pipeline.
Builder image
There are two builder images under ./pipeline folder:
- workflow-builder-dev.Dockerfile - references nightly build image from
docker.io/apache/incubator-kie-sonataflow-builder:mainthat doesn’t required any authorization - workflow-builder.Dockerfile - references OpenShift Serverless Logic builder image from registry.redhat.io which requires authorization.
Note on CI: For every PR merged in the workflow directory, a GitHub Action runs an image build to generate manifests, and a new PR is automatically generated in the serverless-workflows-config repository. The credentials used by the build process are defined as organization level secret, and the content is from a token on the helm repo with an expiry period of 60 days. Currently only the repo owner (rgolangh) can recreate the token. This should be revised.
1.5.4 - Workflow Examples
Our Orchestrator Serverless Workflow Examples repository, located at GitHub, provides a collection of sample workflows designed to help you explore and understand how to build serverless workflows using Orchestrator. These examples showcase a range of use cases, demonstrating how workflows can be developed, tested, and executed based on various inputs and conditions.
Please note that this repository is intended for development and testing purposes only. It serves as a reference for developers looking to create custom workflows and experiment with serverless orchestration concepts. These examples are not optimized for production environments and should be used to guide your own development processes.
1.5.5 - Troubleshooting
Troubleshooting Guide
This document provides solutions to common problems encountered with serverless workflows.
Table of Contents
- HTTP Errors
- Workflow Errors
- Configuration Problems
- Performance Issues
- Error Messages
- Network Problems
- Common Scenarios
- Contact Support
HTTP Errors
Many workflow operations are REST requests to REST endpoints. If an HTTP error occurs then the workflow will fail and the HTTP code and message will be displayed. Here is an example of the error in the UI. Please use HTTP codes documentation for understanding the meaning of such errors. Here are some examples:
409. Usually indicates that we are trying to update or create a resource that already exists. E.g. K8S/OCP resources.401. Unauthorized access. A token, password or username might be wrong or expired.
Workflow Errors
Problem: Workflow execution fails
Solution:
- Examine the container log of the workflow
oc logs my-workflow-xy73lj
Problem: Workflow is not listed by the orchestrator plugin
Solution:
Examine the container status and logs
    oc get pods my-workflow-xy73lj
    oc logs my-workflow-xy73lj
Most probably the Data index service was unready when the workflow started. Typically this is what the log shows:
2024-07-24 21:10:20,837 ERROR [org.kie.kog.eve.pro.ReactiveMessagingEventPublisher] (main) Error while creating event to topic kogito-processdefinitions-events for event ProcessDefinitionDataEvent {specVersion=1.0, id='586e5273-33b9-4e90-8df6-76b972575b57', source=http://mtaanalysis.default/MTAAnalysis, type='ProcessDefinitionEvent', time=2024-07-24T21:10:20.658694165Z, subject='null', dataContentType='application/json', dataSchema=null, data=org.kie.kogito.event.process.ProcessDefinitionEventBody@7de147e9, kogitoProcessInstanceId='null', kogitoRootProcessInstanceId='null', kogitoProcessId='MTAAnalysis', kogitoRootProcessId='null', kogitoAddons='null', kogitoIdentity='null', extensionAttributes={kogitoprocid=MTAAnalysis}}: java.util.concurrent.CompletionException: io.netty.channel.AbstractChannel$AnnotatedConnectException: Connection refused: sonataflow-platform-data-index-service.default/10.96.15.153:80Check if you use a cluster-wide platform:
   $ oc get sonataflowclusterplatforms.sonataflow.org
   cluster-platform
If you have, like in the example output, then use the namespace
sonataflow-infrawhen you look for the sonataflow servicesMake sure the Data Index is ready, and restart the workflow - notice the
sonataflow-infranamespace usage:$ oc get pods -l sonataflow.org/service=sonataflow-platform-data-index-service -n sonataflow-infra NAME READY STATUS RESTARTS AGE sonataflow-platform-data-index-service-546f59f89f-b7548 1/1 Running 0 11kh $ oc rollout restart deployment my-workflow
Problem: Workflow is failing to reach an HTTPS endpoint because it can’t verify it
REST actions performed by the workflow can fail the SSL certificate check if the target endpoint is signed with a CA which is not available to the workflow. The error in the workflow pod log usually looks like this:
sun.security.provider.certpath.SunCertPathBuilderException - unable to find valid certification path to requested target
Solution:
- If this happens then we need to load the additional CA cert into the running workflow container. To do so, please follow this guile from the SonataFlow guides site: https://sonataflow.org/serverlessworkflow/main/cloud/operator/add-custom-ca-to-a-workflow-pod.html
Configuration Problems
Problem: Workflow installed in a different namespace than Sonataflow services fails to start
Solution:
When deploying a workflow in a namespace other than the one where Sonataflow services are running (e.g., sonataflow-infra), there are essential steps to follow to enable persistence and connectivity for the workflow. See the following steps.
Problem: sonataflow-platform-data-index-service pods can’t connect to the database on startup
- Ensure PostgreSQL Pod has Fully Started
If the PostgreSQL pod is still initializing, allow additional time for it to become fully operational before expecting theDataIndexandJobServicepods to connect. - Verify network policies if PostgreSQL Server is in a different namespace
If PostgreSQL Server is deployed in a separate namespace from Sonataflow services (e.g., not insonataflow-infranamespace), ensure that network policies in the PostgreSQL namespace allow ingress from the Sonataflow services namespace (e.g.,sonataflow-infra). Without appropriate ingress rules, network policies may prevent theDataIndexandJobServicepods from connecting to the database.
1.5.6 - Best Practices
Best practices when creating a workflow
A workflow should be developed in accordance with the guidelines outlined in the Serverless Workflow definitions documentation.
This document provides a summary of several additional rules and recommendations to ensure smooth integration with other applications, such as the Backstage Orchestrator UI.
Workflow output schema
To effectively display the results of the workflow and any optional outputs generated by the user interface, or to facilitate the chaining of workflow executions, it is important for a workflow to deliver its output data in a recognized structured format as defined by the WorkflowResult schema.
The output meant for next processing should be placed under data.result property.
id: my-workflow
version: "1.0"
specVersion: "0.8"
name: My Workflow
start: ImmediatelyEnd
extensions:
  - extensionid: workflow-output-schema
    outputSchema: schemas/workflow-output-schema.json
states:
  - name: ImmediatelyEnd
     type: inject
     data:
       result:
          message: A human-readable description of the successful status. Or an error.
          outputs:
            - key: Foo Bar human readable name which will be shown in the UI
              value: Example string value produced on the output. This might be an input for a next workflow.
          nextWorkflows:
            - id: my-next-workflow-id
              name: Next workflow name suggested if this is an assessment workflow. Human readable, it's text does not need to match true workflow name.
    end: true
Then the schemas/workflow-output-schema.json can look like (referencing the WorkflowResult schema):
{
    "$schema": "http://json-schema.org/draft-07/schema#",
    "title": "WorkflowResult",
    "description": "Schema of workflow output",
    "type": "object",
    "properties": {
        "result": {
            "$ref": "shared/schemas/workflow-result-schema.json",
            "type": "object"
        }
    }
}
1.6 - Plugins
1.6.1 - Notifications Plugin
The Backstage Notifications System provides a way for plugins and external services to send notifications to Backstage users.
These notifications are displayed in the dedicated page of the Backstage frontend UI or by frontend plugins per specific scenarios.
Additionally, notifications can be sent to external channels (like email) via “processors” implemented within plugins.
Upstream documentation can be found in:
Frontend
Notifications are messages sent to either individual users or groups. They are not intended for inter-process communication of any kind.
To list and manage, choose Notifications from the left-side menu item.
There are two basic types of notifications:
- Broadcast: Messages sent to all users of Backstage.
- Entity: Messages delivered to specific listed entities from the Catalog, such as Users or Groups.

Backend
The backend plugin provides the backend application for reading and writing notifications.
Authentication
The Notifications are primarily meant to be sent by backend plugins. In such flow, the authentication is shared among them.
To let external systems (like a Workflow) create new notifications by sending POST requests to the Notification REST API, authentication needs to be properly configured via setting the backend.auth.externalAccess property of the app-config .
Refer to the service-to-service auth documentation for more details, focusing on the Static Tokens section as the simplest setup option.
Creating a notification by external services
An example request for creating a broadcast notification can look like:
curl -X POST https://[BACKSTAGE_BACKEND]/api/notifications -H "Content-Type: application/json" -H "Authorization: Bearer YOUR_BASE64_SHARED_KEY_TOKEN" -d '{"recipients":{"type":"broadcast"},"payload": {"title": "Title of broadcast message","link": "http://foo.com/bar","severity": "high","topic": "The topic"}}'
Configuration
Configuration of the dynamic plugins is in the dynamic-plugins-rhdh ConfigMap created by the Helm chart during installation.
Frontend configuration
Usually there is no need to change the defaults but little tweaks can be done on the props section:
            frontend:
              redhat.plugin-notifications:
                dynamicRoutes:
                  - importName: NotificationsPage
                    menuItem:
                      config:
                        props:
                          titleCounterEnabled: true
                          webNotificationsEnabled: false
                      importName: NotificationsSidebarItem
                    path: /notifications
Backend configuration
Except setting authentication for external callers, there is no special plugin configuration needed.
Forward to Email
It is possible to forward notification content to email address. In order to do that you must add the Email Processor Module to your Backstage backend.
Configuration
Configuration options can be found in plugin’s documentation.
Example configuration:
      pluginConfig:
        notifications:
          processors:
            email:
              filter:
                minSeverity: low
                maxSeverity: critical
                excludedTopics: []
              broadcastConfig:
                receiver: config # or none or users
                receiverEmails:
                  - foo@company.com
                  - bar@company.com
              cache:
                ttl:
                  days: 1
              concurrencyLimit: 10
              replyTo: email@company.com
              sender: email@company.com
              transportConfig:
                hostname: your.smtp.host.com
                password: a-password
                username: a-smtp-username
                port: 25
                secure: false
                transport: smtp
Ignoring unwanted notifications
The configuration of the module explains how to configure filters. Filters are used to ignore notifications that should not be forwarded to email. The supported filters include minimum/maximum severity and list of excluded topics.
User notifications
Each user notification has a list of recipients. The recipient is an entity in Backstage catalog. The notification will be sent to the email addresses of the recipients.
Broadcast notifications
In broadcast notifications we do not have recipients, the notifications are delivered to all users.
The module’s configuration supports a few options for broadcast notifications:
- Ignoring broadcast notifications to be forwarded
- Sending to predefined address list only
- Sending to all users whose catalog entity has an email
1.6.2 - Orchestrator Plugin
# ❗DEPRECATED❗
This package has been moved to the red-hat-developer/rhdh-plugins repository. Migrate to using @red-hat-developer-hub/backstage-plugin-orchestrator instead.